11/29/2013

Cardio and Cooking: Celebratory Chicken Parmesan

Half way through today, I breathed a sigh of relief. I've been scrambling for the past couple of weeks to get a professor to supervise my research project for next term, and with only the weekend to spare, I finally got an approval. For some reason, the idea of chicken parmesan sounded pretty good, so I went with it! I can work it off at badminton tonight :)

Things I have learned today about chicken parmesan:
- Chicken parmesan is surprisingly easy to make! It only takes about 25 minutes total.
- I didn't learn this today, but this is a trick for not cooking too much pasta. You can make 1 decent serving of linguine/fettuccine/spaghetti noodles by making a circle with your thumb and index finger so that is about the size of a quarter (the coin), and filling the hole with as many dry noodles as you can fit in that space.
- Most of the cheese on top of the chicken parmesan is actually mozzarella. I made mine without parmesan because I didn't have any parmesan, and just wanted an excuse to use my cheese. 
- According to Wikipedia, it's a regular pub food in Australia? Also, despite its appearance with pasta at places like Boston Pizza, it's apparently typically served with chips (Australian chips, i.e. French fries) and salad. Well, my world just got overturned...fries and salad? Who knew?
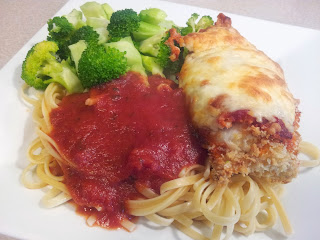
My first chicken parmesan. I've actually never had it in a restaurant either.
Chicken "Parmesan" for One (Adapted from The Food Network)
1 chicken breast
3-4 Tbsp all purpose flour
Salt and pepper
1 egg
1/4 cup breadcrumbs (I just used Panko)
1/2 cup spaghetti sauce (I used Ragu because it was on sale at Loblaws)
1 serving of noodle pasta (I used linguine because it's my favourite, and it was on sale at Loblaws)
1/4 cup shredded mozzarella cheese

1. Preheat oven to 450 F. Line a small baking pan with parchment paper and set aside.
2. Place your chicken breast in a ziploc bag, and seal almost all the way, just so there is some room for air to escape. Use your fist to pound the chicken breast flatter. (It's supposed to make the chicken thinner and therefore easy to cook, but I don't know if it really did anything. It was fun though :D)
3. Add a sprinkle of salt and pepper to flour on a plate, and stir roughly. Beat an egg in a small bowl. On another plate, add breadcrumbs. 
4. Dredge the flattened chicken breast in the flour mixture to coat both sides, then the beaten egg to coat, then the breadcrumbs to coat. Place the chicken breast on your lined baking pan. 
5. Spoon about 3 Tbsp of sauce on top of the chicken breast. 
6. Sprinkle mozzarella cheese evenly across the top of the chicken breast.
7. Place in the oven and bake for 20 minutes until the chicken is cooked through, and the mozzarella is slightly browned.
8. While the chicken is baking in the oven, you can boil some water for pasta and prepare according to instructions. Mine was Barilla linguine, and it took about 9 minutes over medium heat until al dente. After the pasta is cooked, pour into strainer, and place the pot back on the element and set heat to medium-low. Add the rest of the sauce into the pot and cover with a lid to heat. 
9. Add cooked pasta to a plate with your choice of veggies for a side. Spoon heated sauce over your pasta. Remove chicken parmesan from the oven, and carefully place it on top of your bed of pasta. Buon Appetito!

Mmm...celebratory meals are fantabulous. Even at 3 in the afternoon :)

-M

11/17/2013

B-b-b-baking: Apples to Apples

I haven't posted for almost a month, but it's been ridiculously busy lately, so this one will be a combined entry to hopefully keep you more entertained.

Last month, I went with my roommate on a residence fieldtrip to an apple-picking farm. It's called Apple Land Station (329 Richmond St., London, ON). We had a little bit too much fun there...
Apple Land Station!
You could either get a 10 lb. bag for $12 flat, or a 20 lb bag for $20 flat. My roommate, another girl from our building, and I decided to split a 20 lb bag and go pick them together.

They also sold freshly baked goods. We really wanted to try their pies, but they didn't sell them by the slice. The turnovers were selling really quickly, so we grabbed a box to share. The pastry was so light and flaky with just the sweetness of the
apples on the inside, and a coat of turbinado crystals on the outside.

At the end of each "aisle" of apple trees, they had signs that indicated what kinds of apples grew there. Empires were my favourite apples out of what they had. They have such a nice balance of sweet and tart, and they're very crisp - just the way I like them. My favourite kind of all is Fuji. They're a bit sweeter, but it's a bit fainter as well. So good.
Apples!
These were younger trees, so you couldn't pick them yet.

This was my share of the apples that we picked. That's 1/3 of what we picked. We very likely went over 20 lbs, but shhh... ;)
Just this weekend, I made a very brief trip to Toronto to see my 9 month old nephew. My relatives from the GTA came to have dinner together at my aunt's place, but mostly so that they could see the little guy too. As far as extended family, I think I've seen my nephew the most - even P has seen him more than my other cousins! He is so super cute and drooly.

Anyways, before I headed off to Toronto, I wanted to make a quick dessert to bring with me, so I made a galette.

Things I have learned this weekend about galettes:
- Even though it involves pastry, they are super easy to make, and not a bad idea for a dinner party.
- Any fruit combinations that work in a pie would work in a galette, because a galette is essentially a flatter version of a pie with no top crust. You could even use nutella and banana slices like that dessert pizza at Famoso.
- Most galettes that I've seen just have fruit and sugar, so the appearance of the top is drier. Others have honey or syrup brushed over the fruit to keep it from drying out, and to make it kind of glossy. Mine was even lower maintenance than that.
- I used the last of my Empire apples from Apple Land Station for the galette. If you're using apples in a galette or even a pie, they should be a bit firmer so that when you bake them, it isn't all mushy, and has some texture to it. If making applesauce, Paula Red apples are quite good because they just disintegrate as you cook them. I have yet to figure out what works for jams.

These were the last two apples I had from Apple Land Station. I was going to save the butt-shaped one for P, but he didn't want it anyways. I'm sure we'll find another butt apple for him someday. 

The nice thing about galettes is that you don't have to worry about rolling out a beautifully perfect circle, because it doesn't really matter.

You fold the edges over anyways, and if there are irregularities, it just looks "rustic" :)

The final product!
Homemade Galette (Adapted from Pinch My Salt)
1 cup flour
1/4 cup cold butter
4 Tbsp cold water
A shake of salt
1-2 crisp apples
1/3 cup applesauce/jam/preserves/spread
Ground cinnamon
1 egg

1. Combine flour, butter, salt, and water with your fingers, just until it holds together.
2. Wrap the dough in plastic wrap, and put in the fridge for 15 minutes.
3. Preheat your oven to 400 F. Take this time to prepare your apples - peel, core, and slice them. It will depend on the kinds of apples you use. I used 2 medium-sized Empire apples, and I only needed 1 1/2. 
4. Take the dough out from the fridge and flour your counter. Roll the dough flat, and so that it is bigger than the pie plate by at least a couple of inches. 
5. Place the apple slices around in the center of the dough, sprinkle with ground cinnamon, and smother in applesauce. You could also put the spread underneath the apple slices if you prefer, but I was kind of doing it as I went along. It might look more decorative if the apples slices are on top of the spread. 
6. Fold the edges towards the center, exposing a center of fruit-filled goodness. 
7. Beat an egg with 1 tsp water, and brush on the top of the dough. Sprinkle with some more ground cinnamon and/or sugar if you wish. You can use the rest of the egg to make a scramble or something.
8. Bake for 25-30 minutes until the crust is browned a bit. Remove from the pan and serve right away, or reheat it in an oven at 350 F for about 5-10 minutes. Enjoy!

I never imagined eating so many apples and apple products over the last couple of months...

-M